Jul 13, 2013

Classic effects to the your photos.

Hello everybody, Today i'll share nice tips. It's about photo editing. In this article, you will find tutorial about Easy Way to edit your photo, esspecially classic effect photo.


It's the original photo 'they look so pretty right? :) ' 


And it's the photo that has edited. 


"what should i prepare to following this tutorial?"

You just need adobe photoshop, in this article i use adobe photoshop cs3, it sounds ancient? come on, adobe product is expensive. :)


Okay here is the steps.
1. First step, you open photoshop application.


2. Open your photo by click FILE - OPEN


3. Next step is click IMAGE - ADJUSTMENTS - LEVEL or you can use this shortcut: CTRL+L form your keyboard. and will be show this appareance.


Change CHANEL: BLUE, and setting OUTPUT LEVELS right and left navigation.


4. That's All.

Okay, hope you enjoy this article. please share this article to your friends. :)

Thanks you!

Jul 10, 2013

Smooth Skin Photo Effect In adobe

Guys here is the my new tut i will show you how the photo smooth effect in scratch without use of any software only in adobe photo shop cs3. Photo below shows before after effect .

Final Before After


1. Select the quick mask mode tool in the lower of the toolbar palette pickup the brush of nice smooth 35 in my case but your photo like different in mine so choose the brush for your self.


2. Select the photo all the face and neck but leave the area like shown below the photo like upper eye bro , moth , eyes .


3. Hit again lower the toolbar of the quick mask mode or alternatively (Q) by default the selection of the quick mask mode is inverted mode select back to normal selection go to the Select >> Inverse ( Ctrl + Shift + I ) it reverse the selection.


4. When the selection is inverted then hit (Ctrl + J) on the keyboard it will make the new layer from your selection.


5. For purposes of the smooth skin we will apply the new created layer Gaussian Blur so go to the Filter >> Blur >> Gaussian Blur applying the setting in between the (3 - 4) it will be better for our photo.


6. Finally the photo look too much smooth so low down the opacity of the new layer about ( 50%) now it should looks like good.


7. Here is the final and original photos see the difference in between these effect like smooth skin.


There is lot more method is left. Feel free to play with photo shop's filter.

Puzzle Photo Effect in adobe

In this tut i will show the quickly way to add a puzzle effect in your photos in adobe photo shop cs3 like that in the pic below.

Here is the Final Effect of what we have to learn of this tut.
lets start.


1. Open up the original image in photo shop cs3 here is the original image copy it and open it.


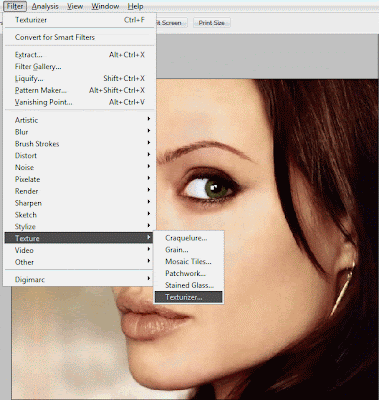
2. In this case open up the Filter>> Texture>> Texturizer click it to open setting dialog box.


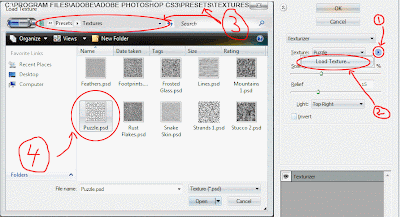
3. In this dialog box click first in the little arrow next to texture drop down a little menu appear to left of the arrow ( Load Texture ) click it this will also open a dialog called Load Texture newly appear box first go to your adobe install director go to adobe cs3 folder in the presets choose texture and click the ( Puzzle.psd ) like shown below to open it.


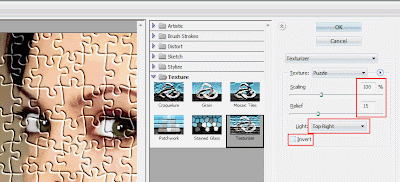
4. Then do for these settings scaling 100% Relief to 15 the light drop down choose Top Right uncheck the Invert hit ok to ok the effect setting see pic


5. Here is the Final Effect of puzzle in adobe photoshop cs3.


Good Bye

3D Text Effect In Adobe Photoshop

In this tut i will show you how to make the 3d text in adobe photoshop cs3 . There is not any tool available for this purposes but i am show you the trick of that kind of thing so lets see theorignal first then to start.


1. Create a blank canvas (400x200 pixel) with fill it black color write down some text with the help of the Horizontal type tool like the picture i we separate the 3d text and text effect text.


2. Rasterize the 3d text layer scale out and free transform selected distort or skew and perspective the text and text effect layer also manage it like shown below.


2. Holding alt key on the keyboard and pressing several time left key it will copy the layer 3d and little left side of it this will make the 3d effect.

3. Now all the new layers marge down it but skip only first layer of name (3d) only like shown below the idea of it.


4. Select the marge layer and apply the layer style of it like shown below.


5. Apply the Outer Glow like shown below.


6. The final result applying the gradient , Outer Glow it should look like this.


If any body like it please comment it out

Removing Red Eye In Adobe

Here come a new tut of adobe photoshop cs3.
How to remove red eye of your photos very easy way step by step tut in Adobe Photo shop cs3.

First of all see the final of this tut below.


1. In the toolbar select the quick mask tool very bottom of toolbar. Then Brush tool and setting up it like shown below and select the eye both in little brush size selected.


2. Go to the Image>> Adjustment>> Desaturate to get out of the red color of eye.


3. You see the picture of below after clicking mask mode it will bring us the selection inverted.


4. So Select the menu Select>> Inverse to inverse the selection what i want for our eye only.


5. Go to the Image>> adjustments>> Levels (Ctrl + L) to adjust the black and whiteness.


6. Setting up the Levels Dialog box like the screen shoot of below.


Here is the Final Image of the tut that's all done in adobe photoshop cs3.

Creating Water Drops In Adobe

Hello for all users i bring up the new tut for you. How to create a water drops from scratch step by step approach in adobe photoshop cs3. There fore its really a lot of tut of that topic of the internet but i am tell you very easy way and every step how to create water drops.

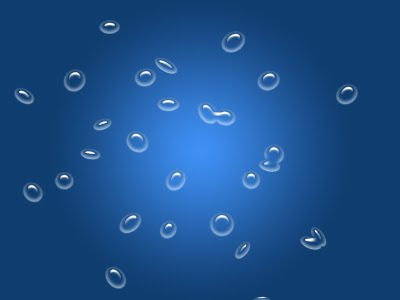
See Final result of our tutorial

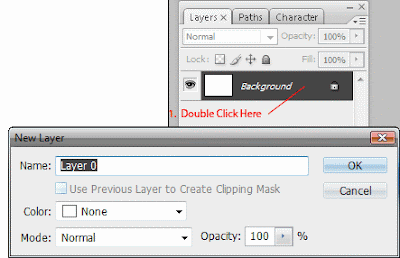
1. First Open the new canvas like ( 400 x 300 ) 72dpi. Then remove the background lock by double clicking front of its name background it will bring up New Layer dialog box just hitting ok or enter the name of you want.

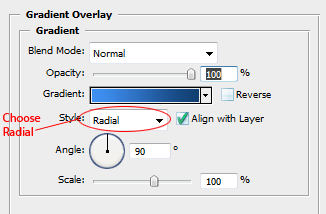
2. Once more time double click the layer to bring up the Layer Style dialog box. In the appear dialog box choose Gradient Overlay choose lighter to darker blue color for Gradient and Choose Radial for Style type. For setting see below picture.


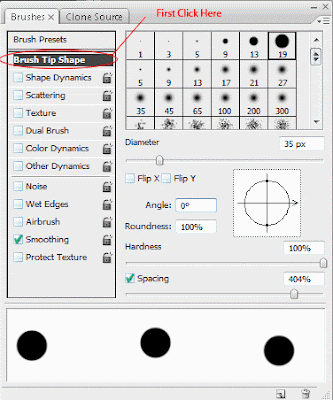
3. Now our background is created. Now its time to create our water drops first so chooseBrush (B) in the toolbar bring up the Brushes setting dialog box by hitting ( F5 ) or Window>>Brushes. The appearing dialog box click Brush Tip Shape and settings up like these setting see below.

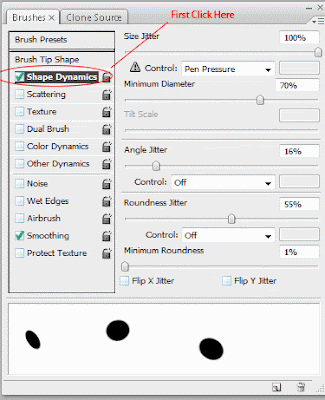
4. Now the next click on the Shape Dynamics and settings up like shown the picture below.

5. Next clicking Scattering in the Brushes dialog box and setting all the setting below by reference picture.


6. Create a new layer by clicking layer palette below for little folded paper from to right second icon or hitting on the keyboard ( Ctrl + Shift + Alt + N ) it will create a new layer then clicking on the canvas to start creating water drops but in this time its not real water drops don't worry.


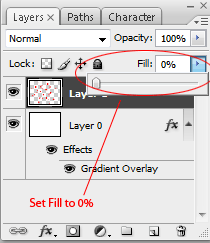
7. Now set the Fill to ( 0% ) for newly created layer to hide all the fill of this layer.

8. Now here come the tricky stuff to creating actual water layer style first double clicking on the new water layer drop layer and apply Inner Shadow by these setting below the picture.
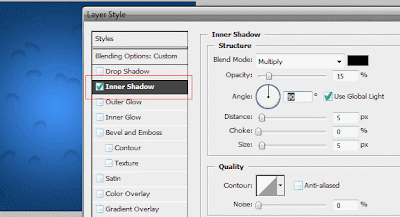

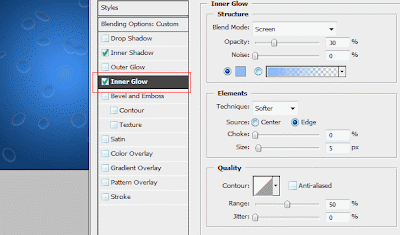
9. Next apply the Inner Glow to our drops like these setting.

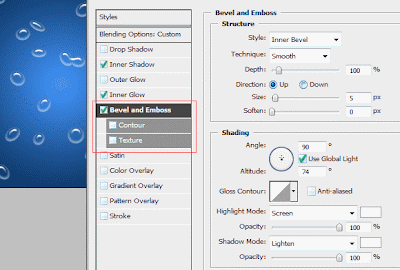
10. Finally Apply Bevel and Emboss to our drops to complete the water Drops effect do the setting like shown the picture below.


Here is the Final of our ended tut.


Thanks you!

Straighten The Photo In adobe

In Some cases the photographer take the picture in his cameras but it does not have to straighten well the angle of the image should not have better.

How to straighten it.
The adobe photo shop cs3 is better handling it.
See The Final of before after.


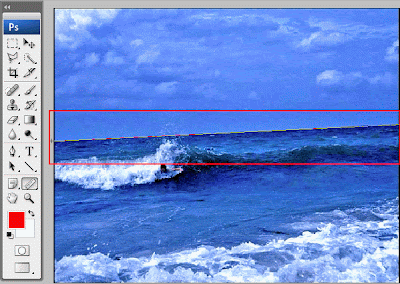
1. First Select the toolbar Ruler Tool like shown below.


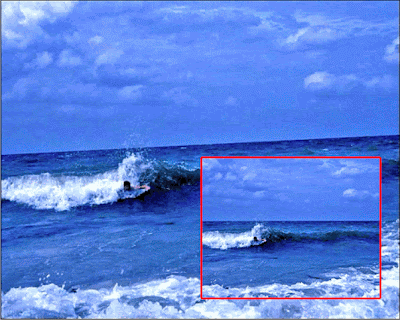
2. Select it right to left first clicking once in the right side of it then do not release the mouse left click drag it to left side of the sea looking screen shoot below.


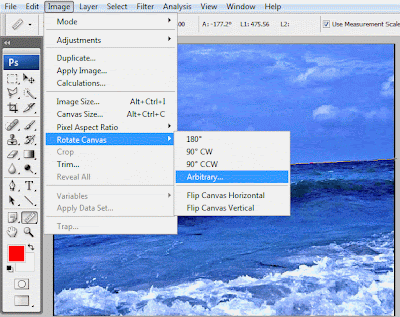
3. Go to the Image >> Rotate Canvas >> Arbitrary.


4. The Rotate Canvas dialog box appear it will automatically guess the angle of the selected ruler line for us hit ok to confirm it.


5. In the Toolbar select the Rectangle marque tool and draw a box on the canvas like shown below .


6. Go to the Image menu Selecting ( Crop ) to crop the selected area .


The Final is shown below .